
Why would anyone want to wax their skis at home?
Well if you’ve skied for a long time, you’ve probably come to realise that taking them into a shop can be expensive. Of course taking them into a shop on occasion can be beneficial, but with a few bits of equipment and about 15 minutes of waxing time can save you a lot of money!
There are a few different ways to wax your skis, but the one below is an at home hot wax, which is the most beneficial and long lasting type of waxing.
How to Wax Your Skis
If you take a close look at the bases of your skis, you’ll realise that they’re actually not flat but have some structure to them. Imagine the bases of your skis have pores almost like your skin, and these grooves or pores in the base need a small wax covering on them to keep you sliding along.
Time and time again I’ve been teaching, and noticed people are having to push themselves over the flat terrain. Whereas if they just had a little more wax on their sis, they could easily be happy cruising along with little effort. It makes skiing just that more enjoyable!
What do you need?
- Waxing Iron – This is probably the most expensive bit of equipment on the list, but can be found online or in most ski shops for around £40. They are almost like a regular iron but the temperature can be regulated which I’ll get onto later. I wouldn’t recommend using a regular Iron as they have little holes in which will be the end of that iron!
- Wax – You can pay whatever you want for wax, but you can by a standard black for around £10-£15. And depending how big it is, you can make it last for 20 uses – so it works out to be well worth it!
- Scraper – This is a plastic credit card shaped tool used to scrape the excess wax off, around £5. An old card will do though!
- Brushes – Again, there are so many brushes out there, but a simple Nylon brush will do. These will go for around £10. Sometimes you can buy kits which include Brass and Horse hair brushes for that super shiny finish, but it won’t affect the performance too much.
- Rubber bands – These are to hold the brakes of your skis up. You can get specialised rubber bands but a few regular ones are just as good.
- Ski servicing bench and clamps (optional) – These will set you back around £100 each, so unless you’re planning on working on a lot of skis everyday then using a table will work fine. Putting some wooden blocks to support the skis on a table has worked fine for me.
The Process
Step 1 – Waxing
First of all, you’ll need something to put your skis on, like a workbench that can hold the ski flat without the bindings hitting the table. You can buy ski clamps and benches, but I’ve found a table with some wooden blocks also work fine. As long as the ski is stable.
First of all, tie those brakes up! It will make your life a lot less frustrating and make it much quicker. Make sure the bases of the skis are clean, by running a damp cloth over them.
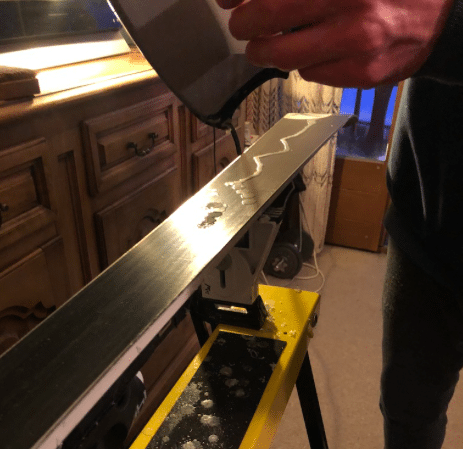
Get your iron plugged in and warmed up, usually the box of wax will tell you what temperature to have the iron on. Then, press the block of wax onto the iron and drip a line of wax from the tip to the tail of the ski, keeping it as even as you can down the length of the ski.
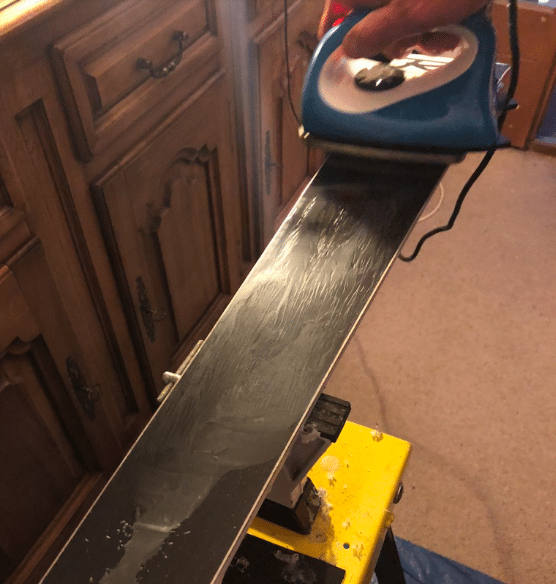
Now, wax the ski just like you would your Sunday shirt. Keep the iron moving all the time and make sure the wax gets spread across the whole ski. It should take around a minute or two to cover the whole ski, just make sure you don’t leave the iron in one place as it can damage the ski.
Repeat on the second ski, and once that’s done, it’s time to sit back and relax. Let the skis sit until the wax is cool, usually 30 minutes or more but the longer you leave them, the more the wax will soak into the base and fill all those grooves.
Step 2 – Scraping
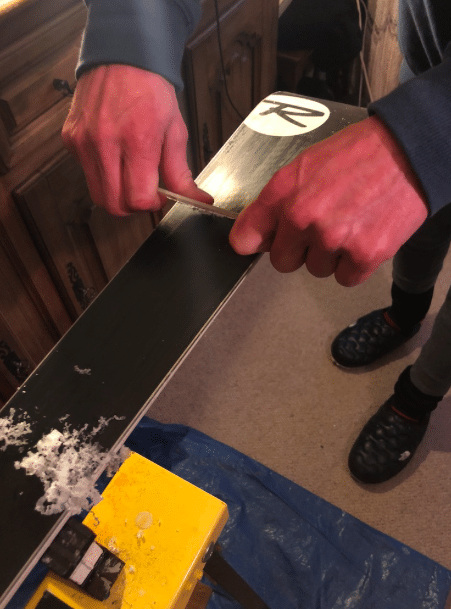
Once the wax has had some time to soak into the ski it’s time to scrape off the excess wax, hold the scraper as in the picture and work your way from tip to tail. Get as much of the wax off as you can and be quite firm with the scraper.
It may seem counter intuitive to be taking all the wax off, but its not the wax that makes you go fast, its the grooves in the ski being slick with the new wax you’ve put on! You will get wax on the edges of the ski a lot of the time so make sure you run the scraper along them as well.
Step 3 – Brushing
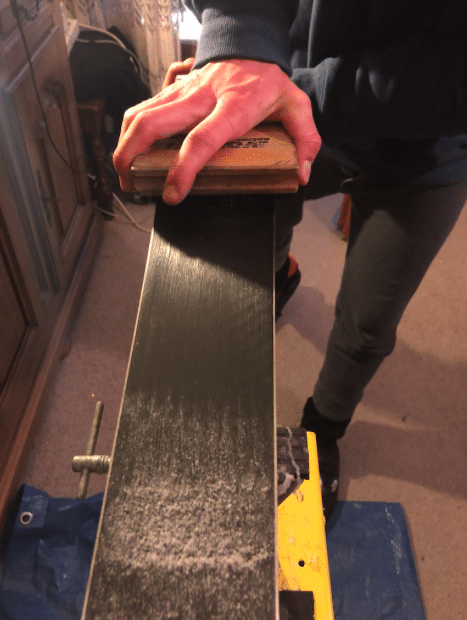
Depending on what brushes you have, the order is Brass, Nylon, and then Horsehair. Now I’m not about to enter the world cup and I’ve found that just using a nylon brush works perfectly well to get around the mountain.
Just as with scraping, work the brush from tip to tail, trying to get the last bits of excess wax out of the grooves. Once the ski is brushed it should have a shiny finish to it. Take those elastic brake holders off and you’re done!
It’s actually impossible to wax your skis too much. If you wanted to do it everyday then feel free. But giving them a going over every week should keep them looking fresh. Hopefully you’ll be racing past your friends or setting that new fastest time on your ski tracks app!